I am so excited to write a post about this mani because I actually think it's my favourite I've ever done!
I saw the idea on @katesbeautybox's instagram and just knew I had to recreate it. Her colour combination was perfect so I tried to match mine as best I could.
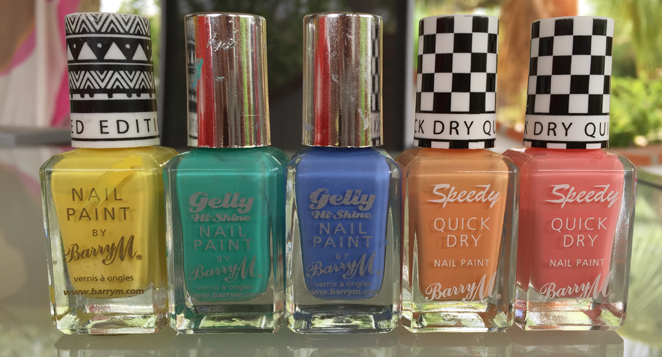
I used:
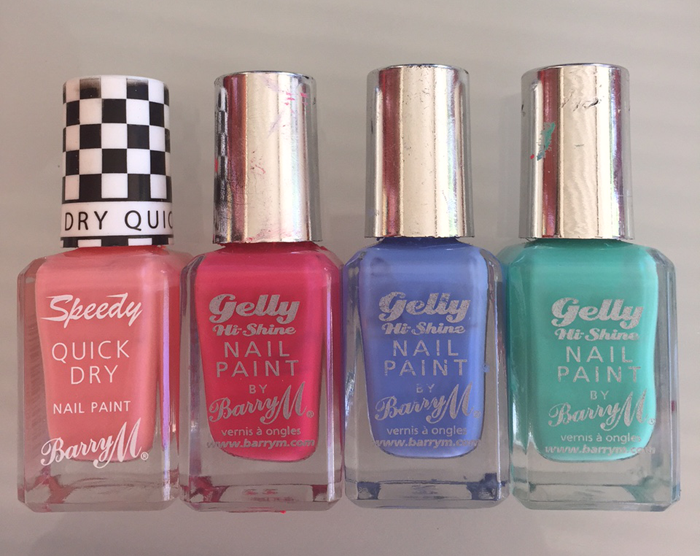
 Barry M's Speedy Quick Dry in 'In a Heartbeat' (SDNP)
Barry M's Gelly Hi-Shine in 'Grapefruit' (GNP8)
Barry M's Gelly Hi-Shine in 'Blueberry' (GNP5)
Barry M's Gelly Hi-Shine in 'Greenberry' (GNP12)
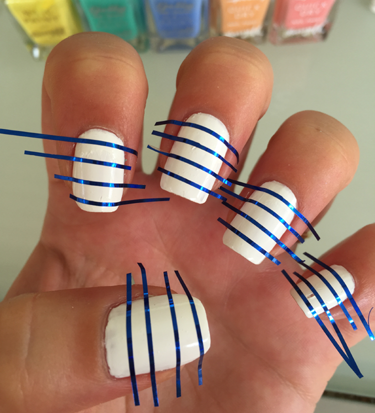
First I painted my nails with my usual white top coat (Barry M's Gelly Hi-Shine in 'Cotton' - GNP35) which is sooooo gloopy it is getting almost unuseable now - I cannot wait to pick up another bottle.
After they were completely dry, I used nail tape that I purchased off eBay to create the design (I forgot to take a picture of this stage - sorry guys!). I used 3 strips of tape on each nail - I cut them all beforehand because cutting nail tape feels like such a chore to me so I like getting it all over with in one go HAHA.
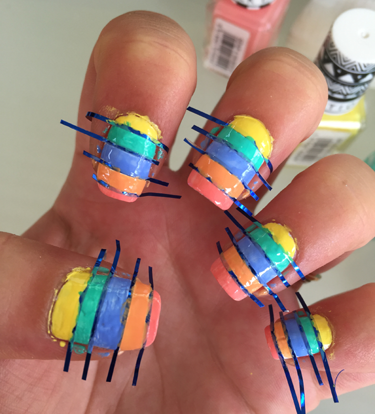
Then, I filled in each block with a different colour from above, making sure I mixed it up on each nail.
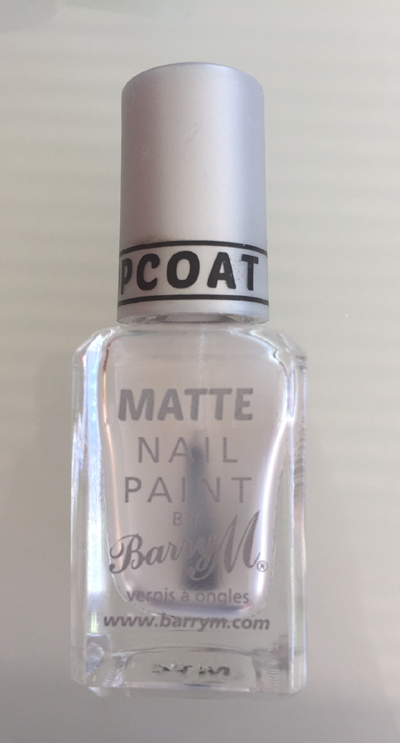
I finished off with Barry M's Matte Top Coat (MTC), which I think was a perfect choice - I love a matte top coat anyway but I think it really finished off this mani in particular.
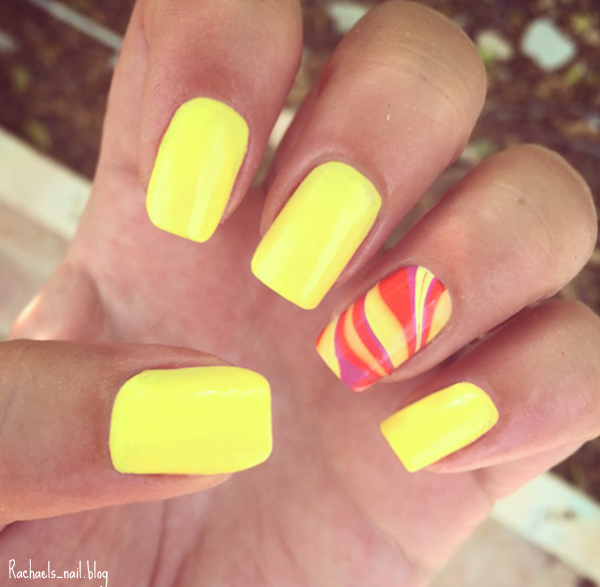
And, well, here is the finished product...
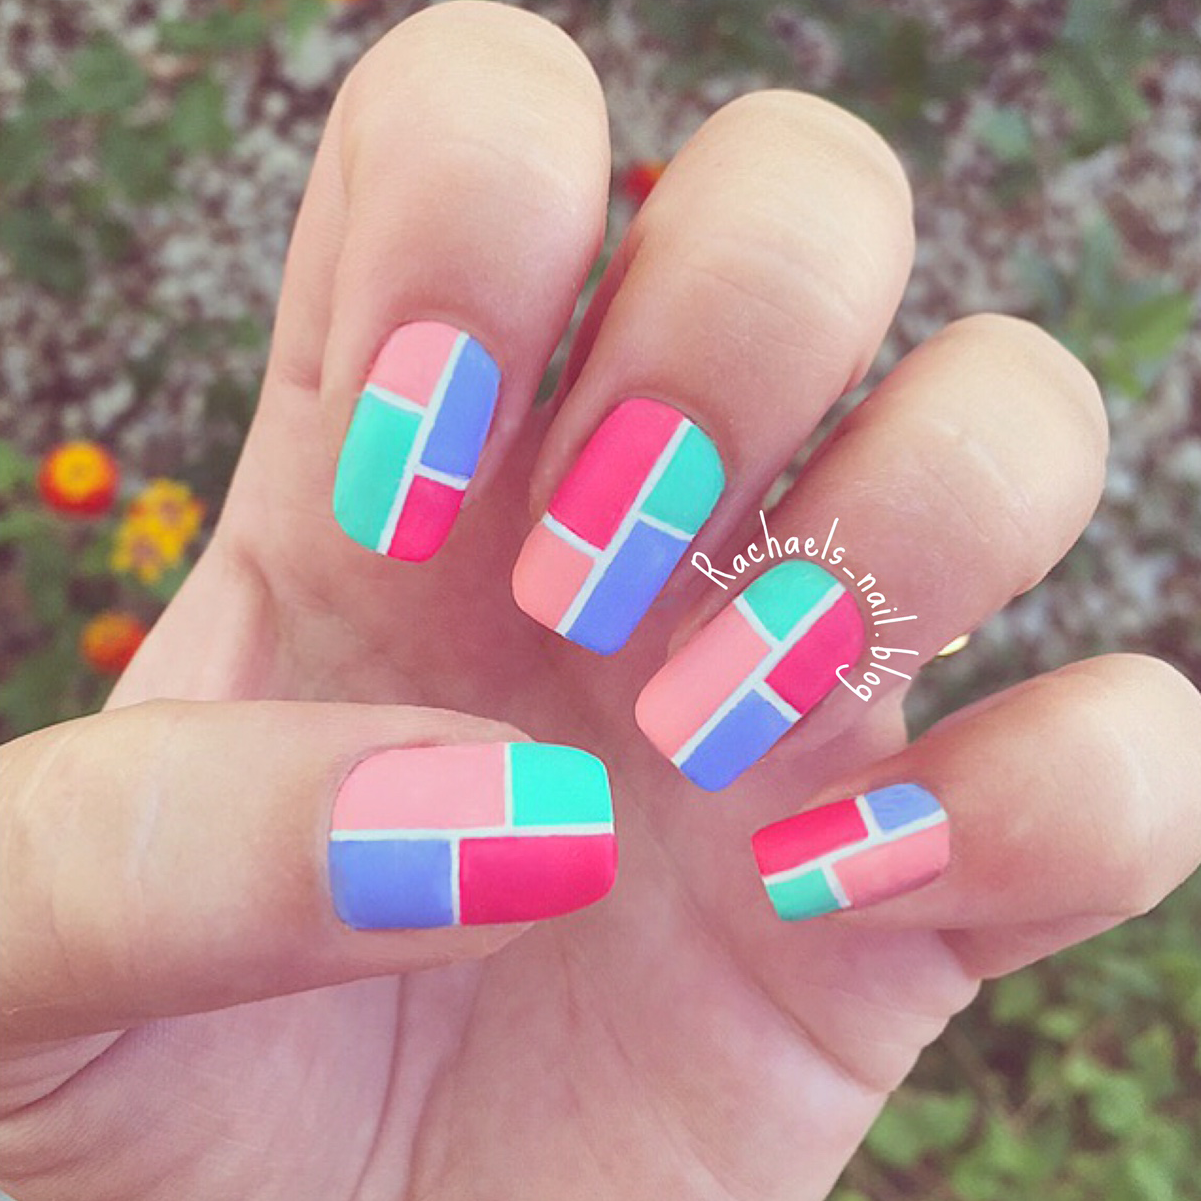
I am literally in love with it, I literally cannot stop looking at my nails right now!
I think this is totally the best mani I have ever done, I waited until my nails were 100% dry before peeling off the nail tape which I think really helped.
The colours are a perfect choice (which I cannot take credit for!) because they make the whole mani look so vibrant against the white base coat.
I also love the matte top coat too - I think it emphasises the block design as you are not distratced by the shiny-ness of a normal top coat.
Let me know what you think on the instagram post for this nail design here.
While you're there if you haven't already please like this photo and follow my account for the latest updates!
Hey guys :)
Today I've got a tutorial post for you! Yesterday I created a pink ombre/gradient mani and I wanted to show you all how I do them!
But before that, I am super excited writing this post because I wanted to show you something!
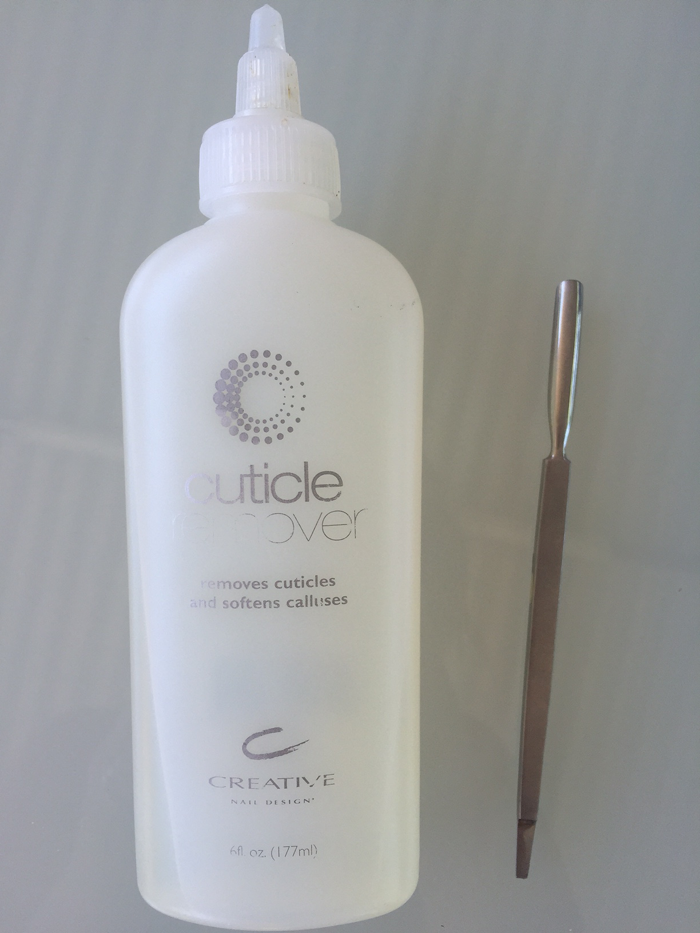
So, my Mum used to be a nail technician, and routing through her old stuff (as I do) I came across this Creative Cuticle Remover and Cuticle Remover tool. How exciting! I had so much fun using this and it's made my cuticles look amazing!
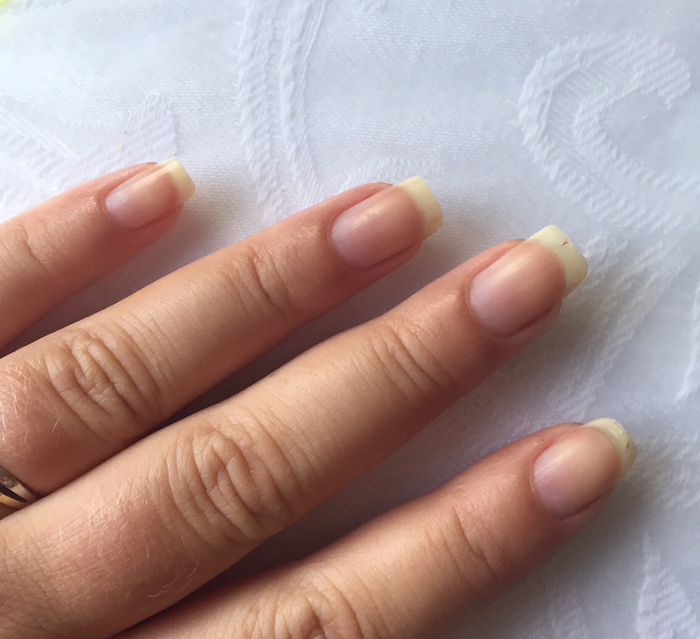
Excuse the splits on the ends of my nails, I know they look terrible. But how great do my cuticles look?! Super exciting!
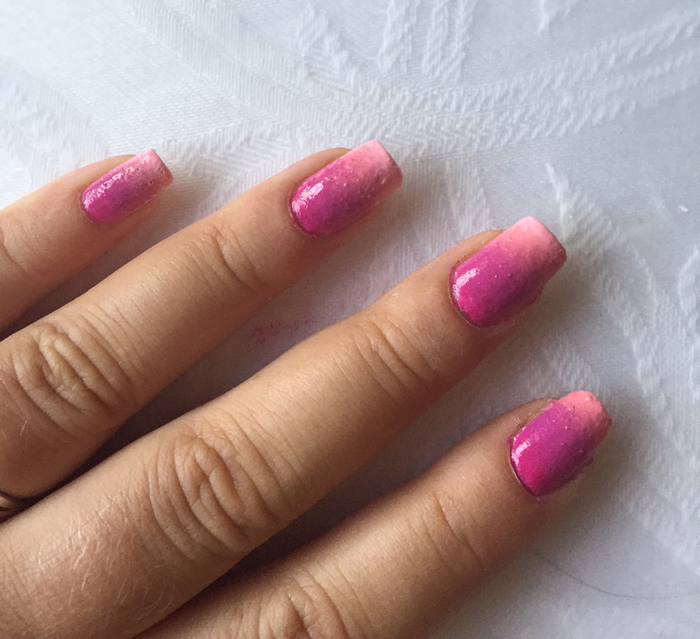
Anyway, back to my ombre tutorial! To begin with, I chose my colours. I've been wanting to do another pink ombre mani for so long, so yesterday morning I thought, well why not! I decided to take pictures every step of the way so I can show you how I do them too!

I used (left to right):
Barry M's Speedy Quick Dry in 'Kiss Me Quick' (SDNP9) Barry M's Speedy Quick Dry in 'In A Heartbeat' (SDNP4)
Barry M's Gelly Hi-Shine in 'Sugar Plum' (GNP38)
Barry M's 'Fuchsia' (302)
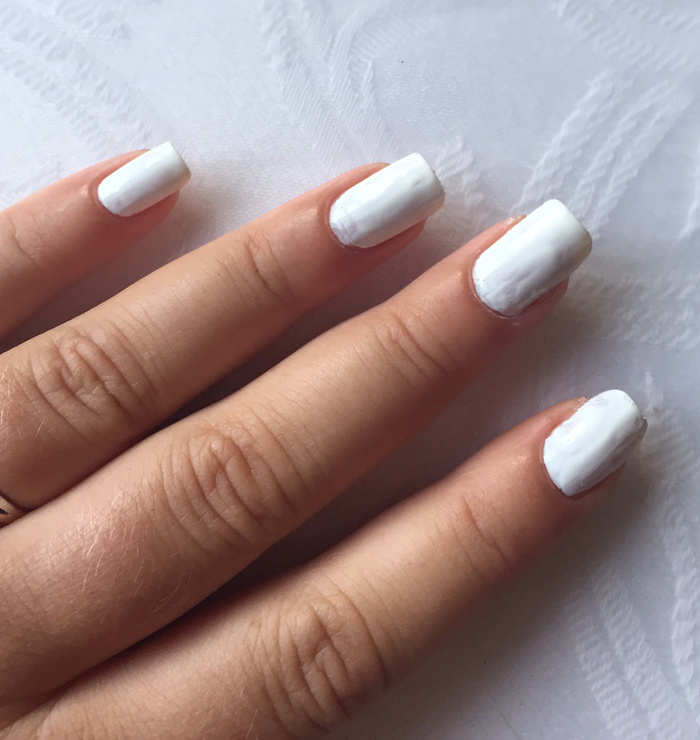
So once I had chosen my nail polishes, I painted my nails with a white base coat (Barry M's Gelly Hi-Shine in 'Cotton' - GNP35); my white is getting really gloopy (*cry*) so they are a bit messy...
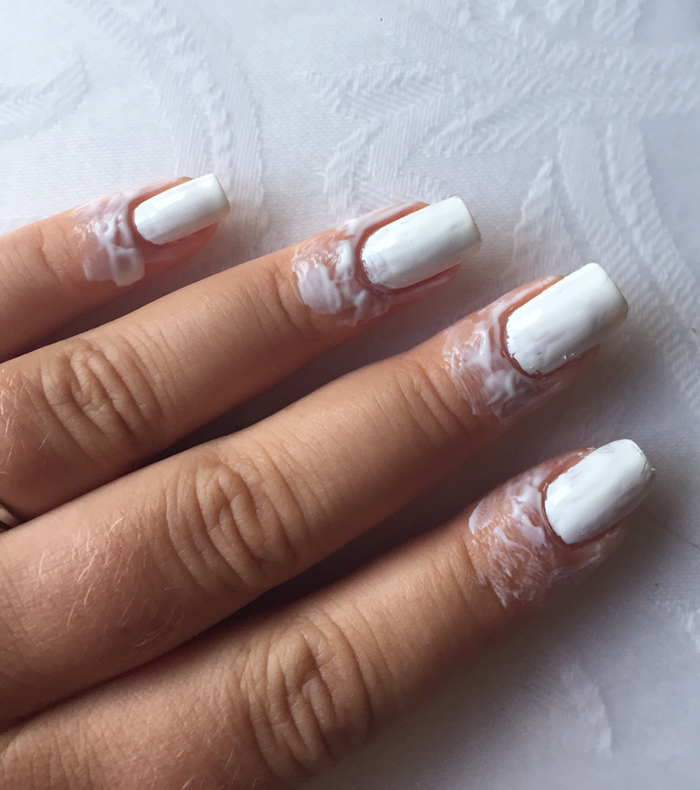
When the base coat was dry, I then applied 'liquid latex', which isn't really liquid latex - it's PVA glue in a nail polish bottle, which I purchased off eBay for about a fiver. I applied it around the nails as neatly as possible for easy clean up after! I absolutely love it because it makes ombre nails super easy to clean up.
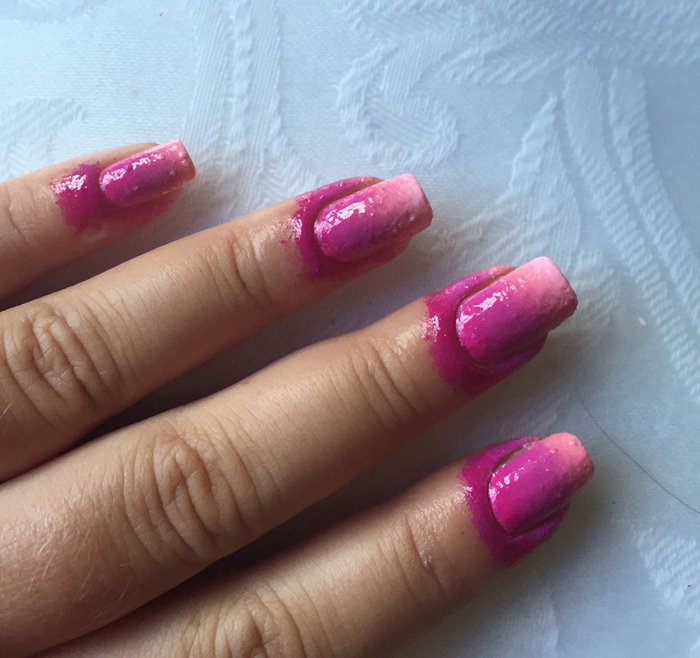
Once the liquid latex had dried (it turns clear when it dries), I painted my 4 polishes onto a kitchen sponge in a row, and then sponged the colours onto the nail. I did each nail one one at a time, and below is after 2 coats.
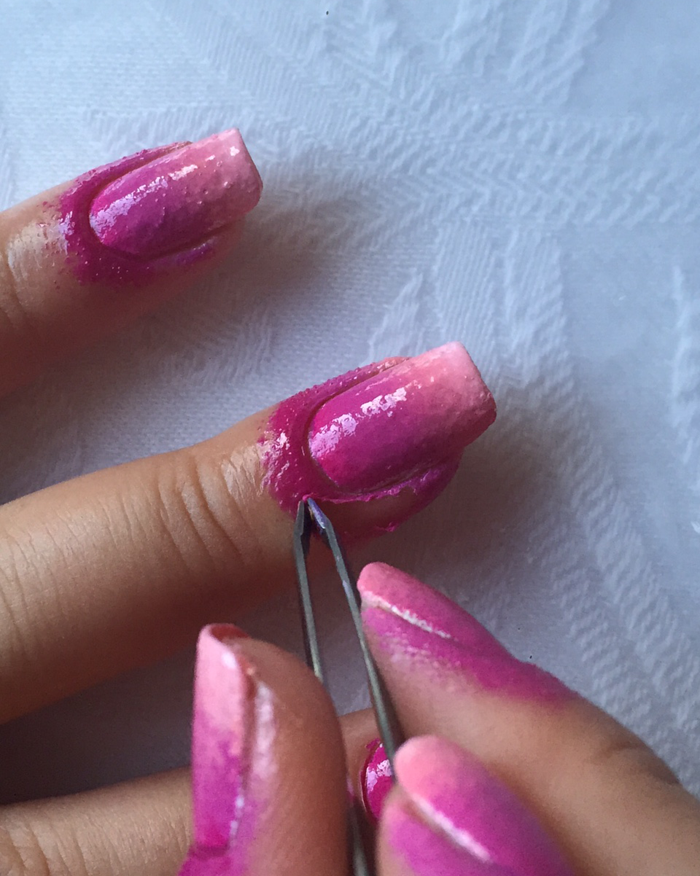
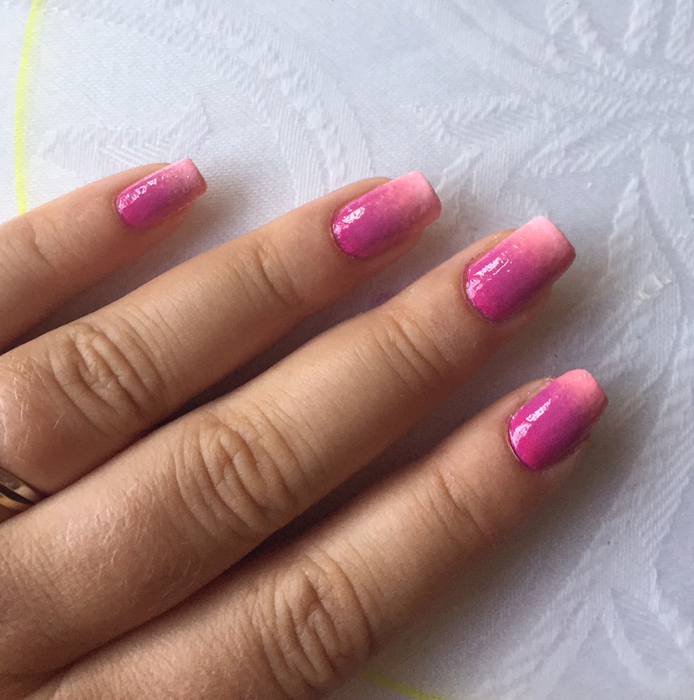
When the polish was completely dry, I use a pair of old tweezers to peel off the latex (my ultimate favourite part of doing ombre nails!).
Any nail polish left around the nail or on the cuticle I removed using a cotton bud dipped in nail polish remover (being careful with the nail polish remover as I didn't want to mess up my other hand either!)
You can see below what I was left with after clean up.
I then applied a top coat, for which I used Barry M's Top Coat 'Clear' (54). I just love applying a top coat as it seals the polish and gives a really clean finish to the mani.
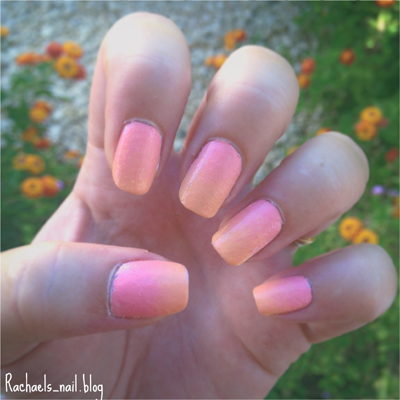
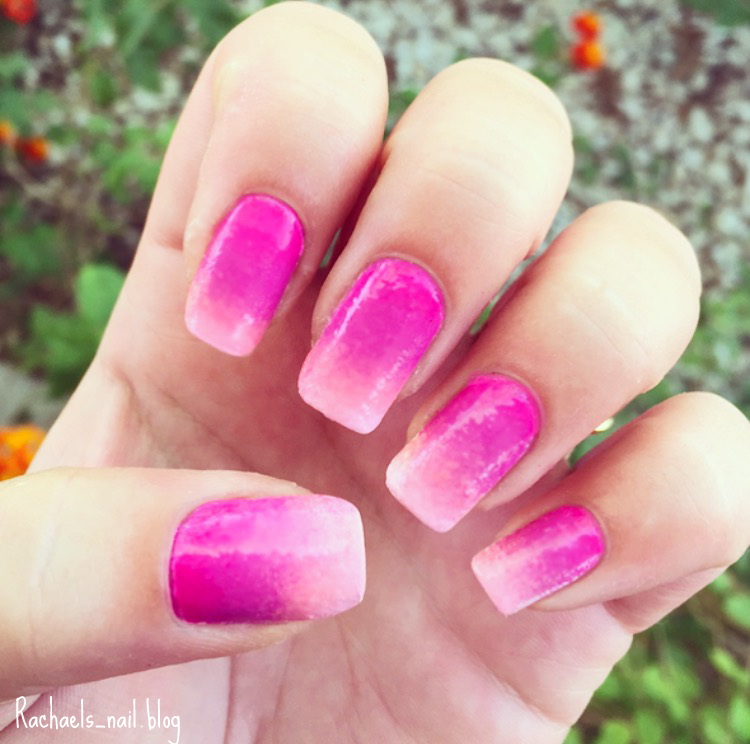
So here is my finished design! I like way the colours blend together, but I think I wouldn't use the fuchsia nail paint if I was to do it again as I don't think it doesn't match the other pinks too well! And how good to my cuticles look using my new cuticle remover? Love them!
My favourite thing about ombre nails is that you can use any combination of colours to create a really pretty mani, and it's pretty easy! After some practice it doesn't take long, and with the liquid latex the clean up is super easy.
So what do you think? If you attempt ombre nails after reading this tutorial please tag my instagram account or DM a picture because I would love to see them!
Let me know what you think on the instagram post for this nail design here.
While you're there if you haven't already please like this photo and follow my account for the latest updates!
Hiiii everyone!
Can I just start off with saying that I can't believe the support I am getting on my Instagram account right now! I've had my account for less than 2 weeks and already have just under 600 followers and more than 3,500 likes on my photos. It's just insane and makes me wonder why I didn't set up this account sooner as I've been obsessed with nail polish and nail art for about 3 years now! So thank you everyone who is reading this right now because it really means a lot to me.
Anyway, boring stuff over with!
So I wanted to do another ombre nail design and as I am getting so fed up of only having 10 nail polishes right now (if you haven't read my previous posts, I've been staying with my parents in Spain for the summer and I could only bring a few polishes with me - it's been a struggle, trust me).
So despite this, I wanted to try a new colour combo for an ombre gradient design, and decided on these 3 colours.
So I was kinda going for a rainbow design, but only have a pastel blue and green with me (and no purple! *cry*) and I wanted it to be pretty vibrant.
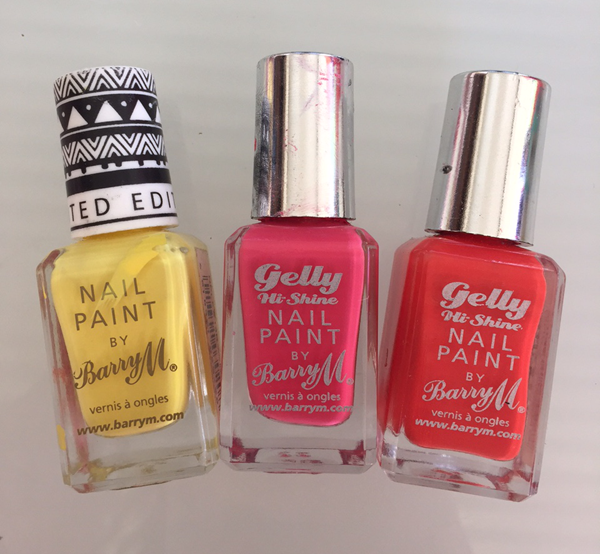
I used these colours; Barry M's Limited Edition Nail Paint (Summer 2013) in 'Yellow' (BLE2013), Barry M's Gelly Hi-Shine Nail Paint in 'Satsuma' (GNP7) and Barry M's Gelly Hi-Shine Nail Paint in 'Grapefruit' (GNP8) - and writing these out I've only just realised these are almost identical to the colours I used for my first attempt at water marbling last week, oops! Oh well.
Okay so, I actually don't really like the way this turned out - not because it looks bad, but the colours didn't really give off the effect I was going for, and instead almost like like I tried to recreate fire (?) which was not my intention.
The orange totally overtakes the pink, which is really sad as you can hardly see it. This is the first time in a while I've created ombre nails with 3 colours and you can't even see one of the colours! LOL!
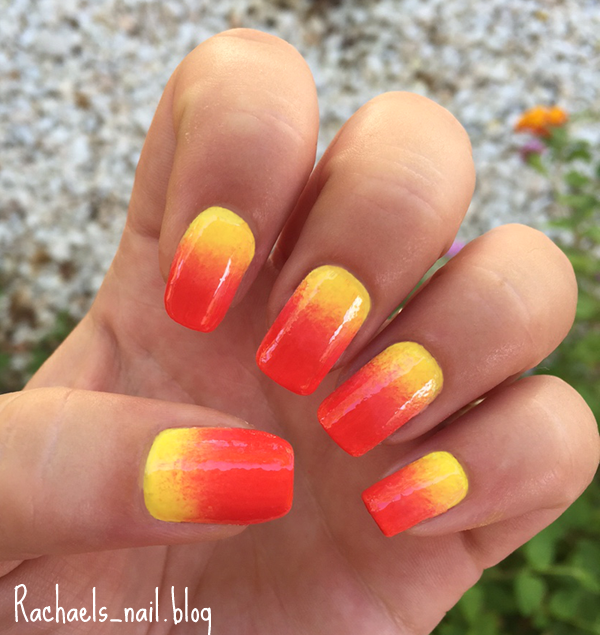
So, kind of a #nailfail for me. Ah well! I'm hoping to use the 5 pinks I've got with me to create another pink ombre design soon so keep an eye out for that
Let me know what you think on the instagram post for this nail design here.
While you're there if you haven't already please like this photo and follow my account for the latest updates!
Hey everyone!
I still can't accept that it is kinda no longer summer, so I am still creating summer mani's and I don't even feel bad, LOL! Here is a post about my latest mani, and actually the first post I've done about water decals, even though I've used them lots of times before! May have to do some throwback posts in the near future.
So here is what I needed for water decal nails.
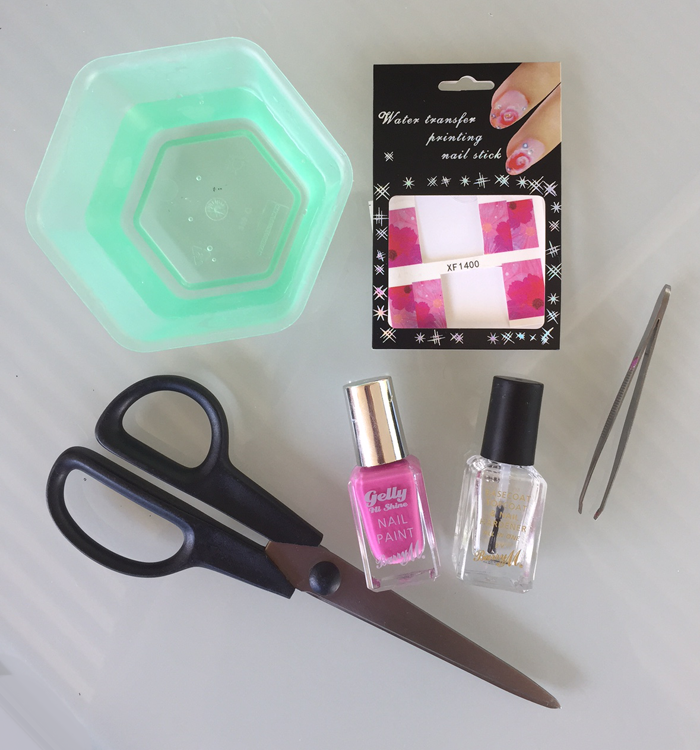
By the way I forgot to take this picture before I started, so the sheet of decals is already cut LOL.
Barry M's Gelly Hi-Shine in 'Sugar Plum' (GNP38)
Barry M's Top Coat 'Clear' (54)
A Pair of Scissors
A Pair of Spare Tweezers
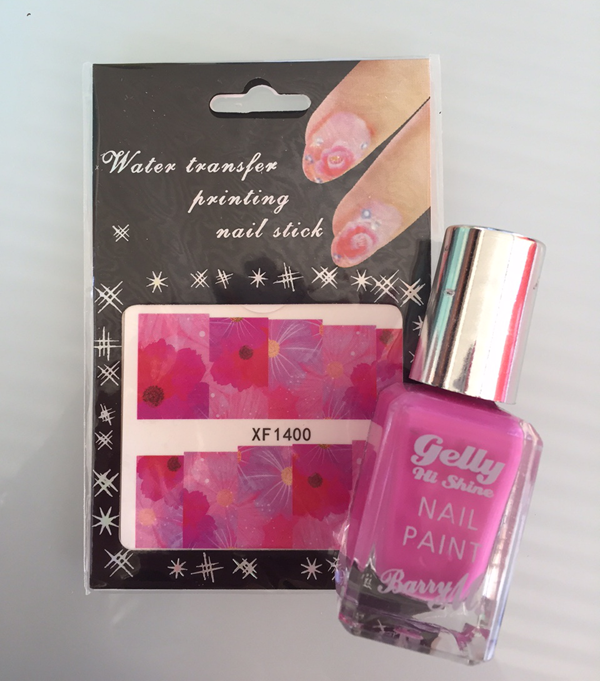
Water Decal Transfers
A Small Bowl of Water
Before I forget, I purchase my water decals from eBay. You can search 'nail water decals', or the ones I purchase are from a seller called jackandpanky. A sheet normally costs 99p, but there is often an offer on which is buy 4, get 4 free, which I think is super cheap! She also offers free delivery, and posts all over the world. For more info, check out her seller page on ebay here.
Okay, back to the nails.
I chose Barry M's Gelly Hi-Shine in 'Sugar Plum' (GNP38), not only because it is currently my favourite polish, but I think it matches the colours of the decals really well.
I start by painting my nails with my base colour, in this case it's 'Sugarplum'.
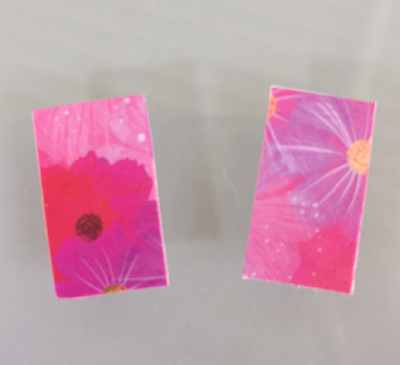
Then, I cut rectangles out of the sheet, not forgetting to peel the protective film off the top of the sheet first. I cut them into rectangles, then cut them down to my name shape when I am ready to apply them.
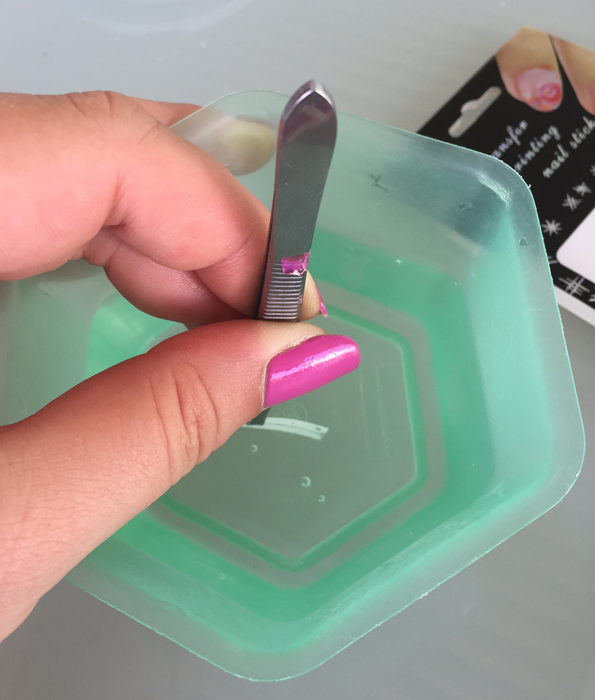
After I have my nail shapes ready and my base coat of polish is completely dry, I use the tweezers to submerge each decal into water (I use tap water - I don't think the temperature or type of water effects the finished result as far as I know) for around 10 seconds so it is wet.
I then take it out of the water and the background sheet should slide off of the decal pretty easy now. I then place the decal onto my nail, dab dry with a paper towel, and then leave it and move onto the next nail.
By the way I use a spare pair of tweezers for all my nail designs because, as you can tell, they get covered in polish!
So once I've applied all the decals I want to, and they are completely dry, I then use a top coat to seal the decal onto the nail to make sure it doesn't fall or chip off.
I use Barry M's Top Coat 'Clear' (54) but any top coat will work fine!
Below is my finished result! I have used my 2 middle nails as feature (or /accent) nails, but you can obviously do as you wish - you can cover all of your nails with water decals, or do just one or two of them.

Obviously the more you practice with water decal transfers, the easier they get. But they aren't really that hard at all! Even the first time I tried they looked pretty good, if I do say so myself! I think the trick is to cut the decal to fit your nail almost perfectly so you have a clean finish to your mani. Also, using a colour that matches some or all of the water decal works well too, especially if the decal is too small to fit your entire nail.
I'm really pleased with the way these turned out, they are definitely my best yet! I Hope you enjoyed this blog post, and if you decide to try out water decals after reading this post, please tag or DM me on my instagram I would love to see them!
Let me know what you think on the instagram post for this nail design here.
While you're there if you haven't already please like this photo and follow my account for the latest updates!
Water marble, water marble, water marble
- it's all anyone ever hears in the nail world!
What we don't hear, is that nail experts make it look so easy,
tutorials, 'how-to's.. but it is actually so difficult!
I mean, I never expected it to be easy, but wow - this is something that now I have started I cannot stop and I need to PRACTICE, PRACTICE, PRACTICE until I can perfect it, because it looks A-MAZING!
First, colour choice. Unfortunately, staying with my parents in Spain for the summer has its disadvantages - I had to leave my nail collection behind *cry*.
Choosing like, 10 nail polishes for the entire summer was a struggle. Choosing 3 out of 10 nail polishes to put together in a water marble nail effect was an even bigger struggle!
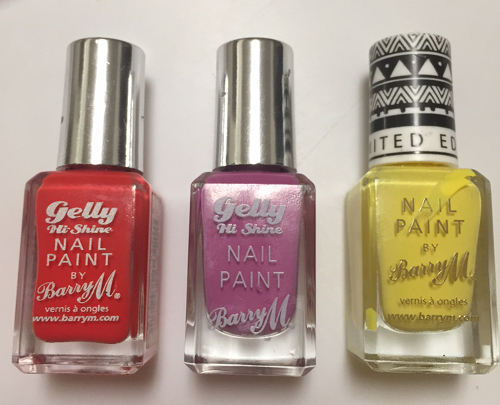
But I decided on Barry M's Limited Edition Nail Paint (Summer 2013) in 'Yellow' (BLE2013) with Barry M's Gelly Hi-Shine Nail Paint in 'Satsuma' (GNP7) and Barry M's Gelly Hi-Shine Nail Paint in 'Sugarplum' (GNP38) (which is also my current fave which you can check out on my swatches page/or my current favourite polish page).
I chose them because they are vibrant summery colours, but also because I couldn't choose any of my Barry M Speedy Quick Dry polishes because they dry too quick for water marbling!
Just so you're aware, I'm not going to be doing a 'tutorial' for this as such, as there are thousands of tutorials online to help (this one helped me today). But I am going to talk you through the madness that is water marbling!
So I had my nail polishes ready.
...and I had my set up.
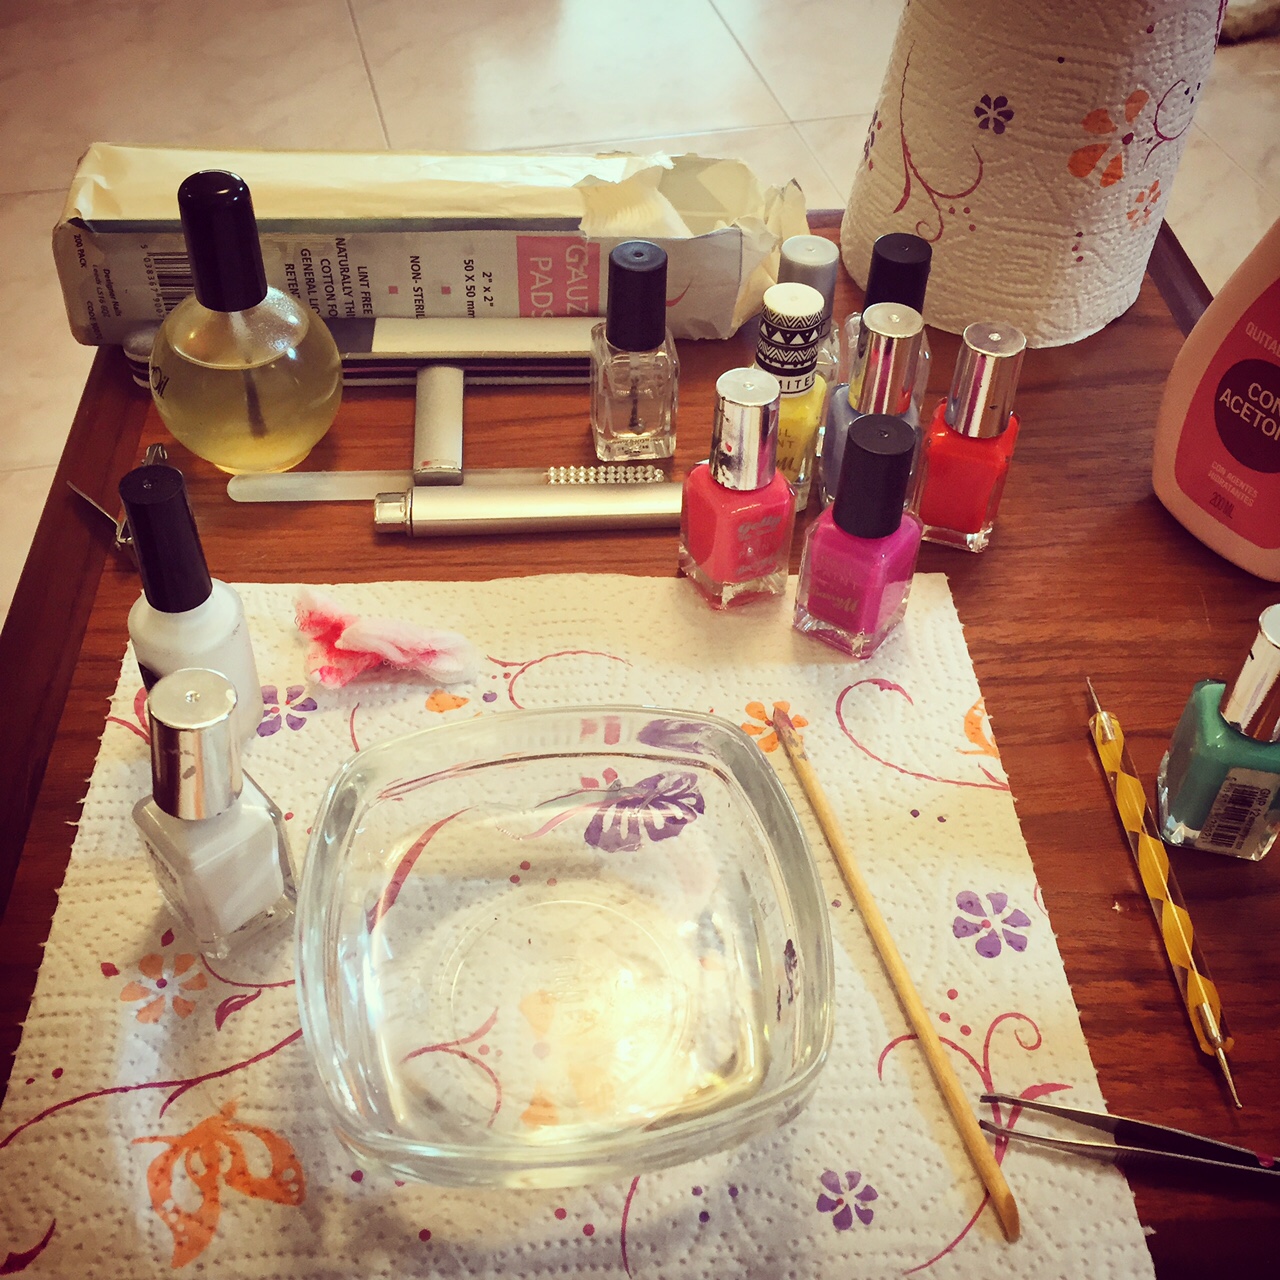
...my white nail polish (Barry M's Gelly Hi-Shine in 'Cotton' - GNP35) base coat was on, my 'liquid latex' was on...
And this is what happened. LOL.
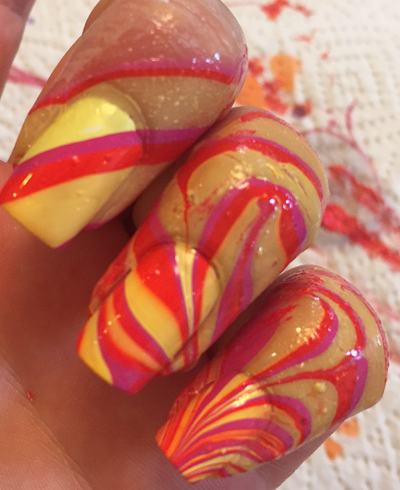
I mean, in all fairness, it wasn't THAT bad. All the nails had some kind of water marble effect on them. My middle finger less so! I did like my little finger yes, but it in no way matched my ring finger (the only nail that looked somewhat acceptably water marbled!)
After a few more attempts at getting my other nails looking somewhat acceptable like my ring finger, I gave up (#nailfail)! Choosing to just keep the water marble on my 'accent nail', I finished off my mani by painting the rest of my nails with Barry M's Limited Edition Nail Paint (Summer 2013) in 'Yellow' (BLE2013).
I've had an amazing response on Instagram since I posted this mani, and it has grown on me the more I look at it, alongside all the kind comments I've had about my first water marble attempt. Nail fail? Maybe, but practice makes perfect and I am not giving up until my water marble nails are perfect!
Let me know what you think on the instagram post for this nail design here.
While you're there if you haven't already please like this photo and follow my account for the latest updates!

Hiiii everyone,
Happy Wednesday! - Hope you're having a good week.
So it may be September but where I am currently (Spain) the sun is still shining so it is still technically summer for me, so here is a fresh summer mani to match the weather.
I took inspiration for this mani from 'ezzie.diy.nails' on Instagram, but wanted to mix it up slightly and I therefore chose different colours to recreate the design. I went for more pastelly summer colours so I chose (pictured left to right):
Barry M's Limited Edition Nail Paint (Summer 2013) in 'Yellow' (BLE2013)
Barry M's Gelly Hi-Shine Nail Paint in 'Greenberry' (GNP12)
Barry M's Gelly Hi-Shine Nail Paint in 'Blueberry' (GNP5)
Barry M's Speedy Quick Dry Nail Paint 'Full Throttle' (SDNP1)
Barry M's Speedy Quick Dry Nail Paint 'In a Heartbeat' (SDNP4)
To start with, I painted my nails with Barry M's Gelly Hi-Shine in 'Cotton' White (GNP35), one of my favourite polishes and one I use in most of my manis as it is so diverse!
Once they were completely dry, I cut 20 (4 for each nail on my left hand) strips of nail tape, approx. 2cm in length.
Then I went on to stick the nail tapes horizontally across each nail with equal distance in between (well, this was the plan - I can't say they had the same distance in between, nor were they really that straight; note my index finger LOL).
Next, I used each of the colours to fill in the spaces between the tapes, see below :)
Okay, it's a bit of a mess as you can see! But once the first coat was dry, I added another coat to make the colours really vibrant, especially as they are on the white base coat too, which always helps make the colours really bright.
Once the second coat of colours was completely dry, I carefully peeled off the nail tapes..
After a bit of a cuticle clean up, and a touch up here and there where the colour hadn't completely taken (on the sides of my nails mainly), my mani was complete.
Top coat: Barry M's 'Clear' Top Coat (54)
A voila, check out the finished mani below!
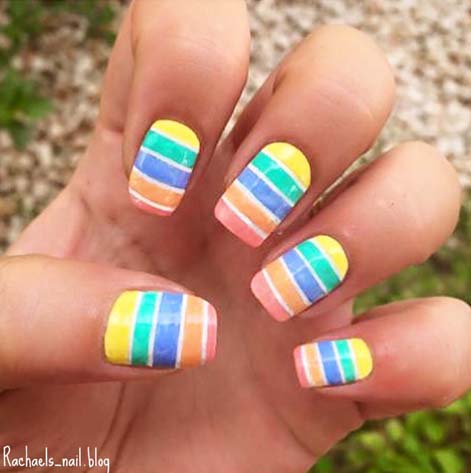
I'm quite chuffed with the final result! I mean, the lines aren't that straight, the gaps aren't that equal, and the overall polish is not that neat. But overall, I think it looks like a really summery mani using loads of different colours which was what I set out to achieve in the first place!
So, what do you think?
Let me know what you think on the instagram post for this nail design here.
While you're there if you haven't already please like this photo and follow my account for the latest updates!
So I have been completely overwhelmed with the response on my Instagram! I have gained over 130 followers in 2 days so I am super happy! If you aren't yet following me, please do for all my latest nail designs and updates! The link is in the panel on the right >
Here is a blog post for my latest mani! I've taken some inspiration from various posts I've seen on Instagram over the last couple of days and come up with my own 'half and half spotted' nail design.
So what nail polishes did I use? Well, I've only recently purchased Barry M's Gelly Hi-Shine in 'Sugar Plum' (GNP38) from the new Summer 2015 Gelly collection, and immediately fell in love with it's colour! In some lights in looks pink, and in others purple; but it is a really vibrant colour with great coverage and it's super shiny so I thought it would be perfect for this mani!
I also used Barry M's Gelly Hi-Shine in 'Cotton' (GNP35), which is a perfect shade of white which I use a lot in my nail designs as it is bright white with pretty good coverage. I think the pink and white together are a good match, as they are both such bright colours. Perfect for a design like this one.
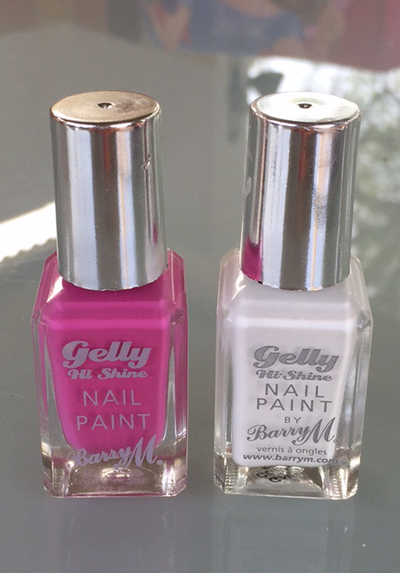
I started by painting my nails with 'Sugarplum'.
I used nail tape which I purchased from eBay for 99p. Absolutely bargain. If you don't have any - get some! (Toy story quote, sorry)
I cut off 5 strips, a couple of centimeters in length each, and I laid them across my nail in the same direction on every nail.
Next, I painted the white nail varnish over the top section of the nail tape. I used 2 coats to ensure even coverage, as it was going on top of the pink.
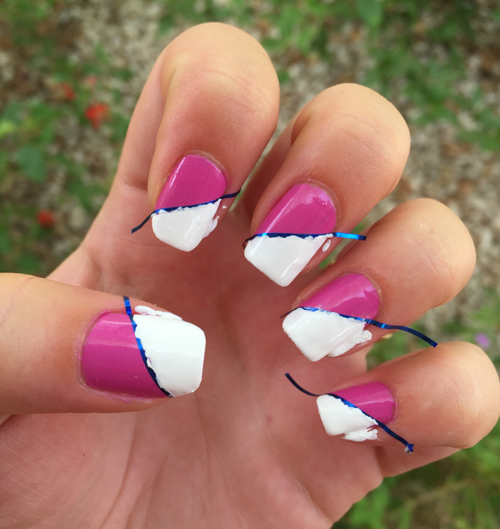
The next step was to wait for the white to dry. I made sure it was really dry, leaving it around 30 minutes, as I didn't want it to pull as I took the tape off.
After removing the tape, I used a dotting tool to first put white dots onto the pink side of the line.
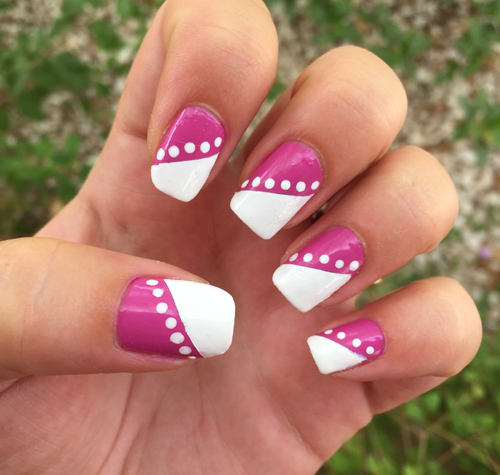
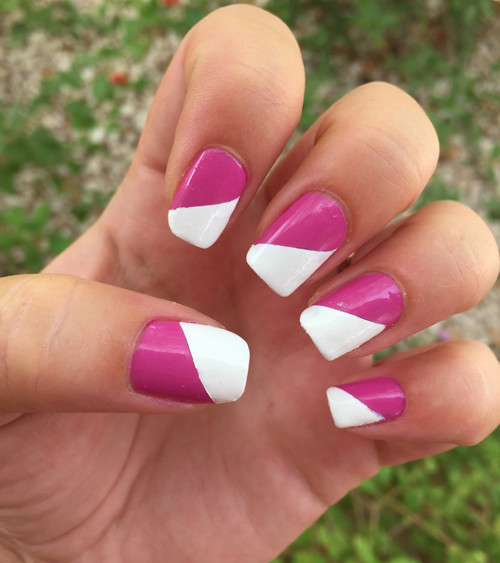
For a while I debated leaving them like this, as I quite liked it! But I finally completed the pink dots on the white side of the nail.
Finishing off with Barry M's 'Clear' Top Coat (54), my mani was finished!
I am so proud of the results, out of all the things that went wrong (pulling the tape too early, smudging the dots..etc..) - nothing did!
Let me know what you think on the instagram post for this nail design here.
While you're there if you haven't already please like this photo and follow my account for the latest updates!